
The war on stuffed animals pretty much sums up the battle we have been waging since our daughter was born and one I had fought growing up.
My daughter and son love their stuffed animals, who can blame them, not me, I loved all my stuffed animals too!
The war is how you actually store them….
I use to have them all lined up on my kids beds until my son got the stomach bug and I quickly stripped everything but pillows and blankets from both my kids beds. Cleaning up after the stomach bug is bad/sad enough when you have to constantly change the sheets and wash clothes covered with some bodily function, but it’s horrible when you face the issue of asking yourself whether or not a beloved stuffed animal will survive the needed cleaning.
There are tons of ways to store stuffed animals, baskets, bins, on your bed, or what I thought was the coolest, the stuffed animal hammock.
http://www.pinvested.com/2012/06/01/stuffed-animal-hammock/
I loved how the hammock could condense the stuffed animals and get them ‘out of the way’. The only problem was…it is really hard to get to the stuffed animals to actually play with them.
Thank you Pinterest for the following organizing moment of inspiration!
I was so excited when I saw ‘The animal zoo’ on Pinterest. I always admired the big ball display at big box stores, but never thought about applying it to my home.
Most animal zoo’s I saw on Pinterest were made out of wood and bungee. I just wasn’t too sure about how the wood would be with the bungee(how to attach the bungee to the wood) so I decided to go to my kids rooms and look at their problem areas….
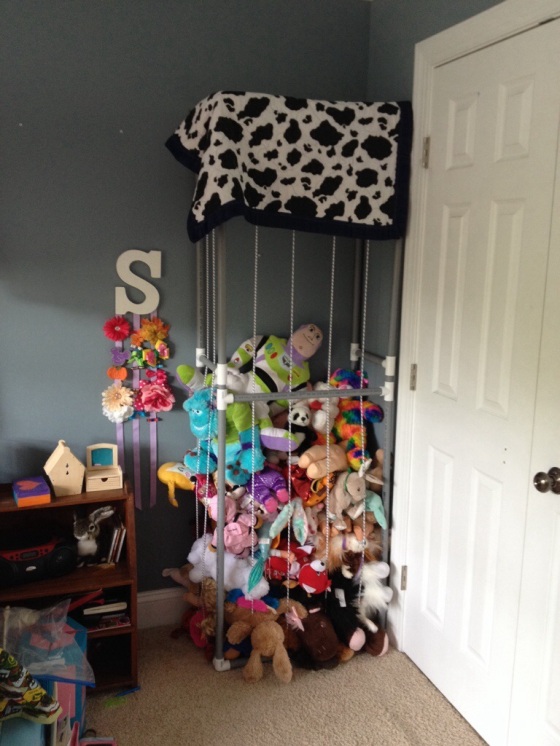
My daughter’s problem area:

My son’s problem area was much smaller but I decided he needed a zoo as well to ensure a proper home for everything:-)
I took down the critical measurements for both problem areas. In both rooms, I put the zoo in corners so that I would only have two sides that would be exposed:-). I also put them in the corners of my kids room where the space just wasn’t really ‘usable’. The space behind their closet doors.
Here was my first draft sketch:

After a trip to the hardware store I realized I needed a few changes;-). That’s the fun problem solving part:-). My friend had asked for my rough design and she actually built it before me using offset t’s:-). After she and her family built it I figured we had better do it now or never!!! Lol!!! I love how friends can give you the motivation for action!!!
When my son was in preschool last week, I did a quick run to Lowes Home Improvement and let my creative thinking run!
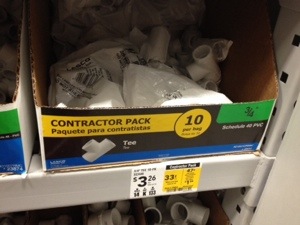
Here are some of the pieces that brought about our end result…we went with all 3/4″…I had taken pictures of various sizes just in case:


I also found bungee cord by the foot at our local hardware store(but have heard you can get it at REI as well)
So I showed my design and pieces of inspiration to my husband and we brainstormed. We settled on 3/4″ conduit piping instead if regular PVC. We did this just on price.
We used 4, 10′ pieces for each zoo.
On a beautiful afternoon we got out the saw and started cutting and assembling:-). We had to modify the measurement to allow for the fittings(always make sure you think about how the fitting will add to your measurements)

The following day we drilled the holes for the bungee, washed it all down, threaded the bungee and then installed:-)


My kids LOVE these!!!! My daughter calls hers an Animal Barn, my son calls his a Rocket Ship. We will let the kids decorate these and might add fun tops to it. It has cleaned up their room corners PERFECTLY!!! Best of all they can SEE most everything in their stuffed animal barn/rocket. It’s a fun game to put their toys away(basketball), and it didn’t cost us a lot to do this.
Final costs per animal barn/rocket:
4-10′ pieces of conduit: 4x$2.13=$8.52
8- 90degree elbow: 8x$1.60=$12
6-t joints: 6x$0.47=$2.82
30′ bungee: $11
1 pipe strap: $0.20
Final cost per unit: $34.53
I don’t think that’s a terrible price for this project and I love how it has helped clean things up!
Remember….They Will Love Your Effort!!!